My Favorite Braid

I had bangs years ago and as I was growing them out, I apparently invented a new braid?

Anyway, this has become my favorite way to wear my hair (when I have the time to do it) and I often get compliments and questions on how I did it.

So here’s how! (apologies for the number of photos, it is super hard to get a photo that shows the whole braid, especially by myself!!)

It’s just a basic french braid that you make in a spiral around your head. It takes a while to figure out how to make the spiral, but once you’ve got it, its pretty easy.

Will try to make an actual video of the process someday….

And the process:

start with a diagonal side part

grab a small section and start a classic french braid

once you reach the crown of the head and the end of the part, your inside sections will be very small and fan out from one point

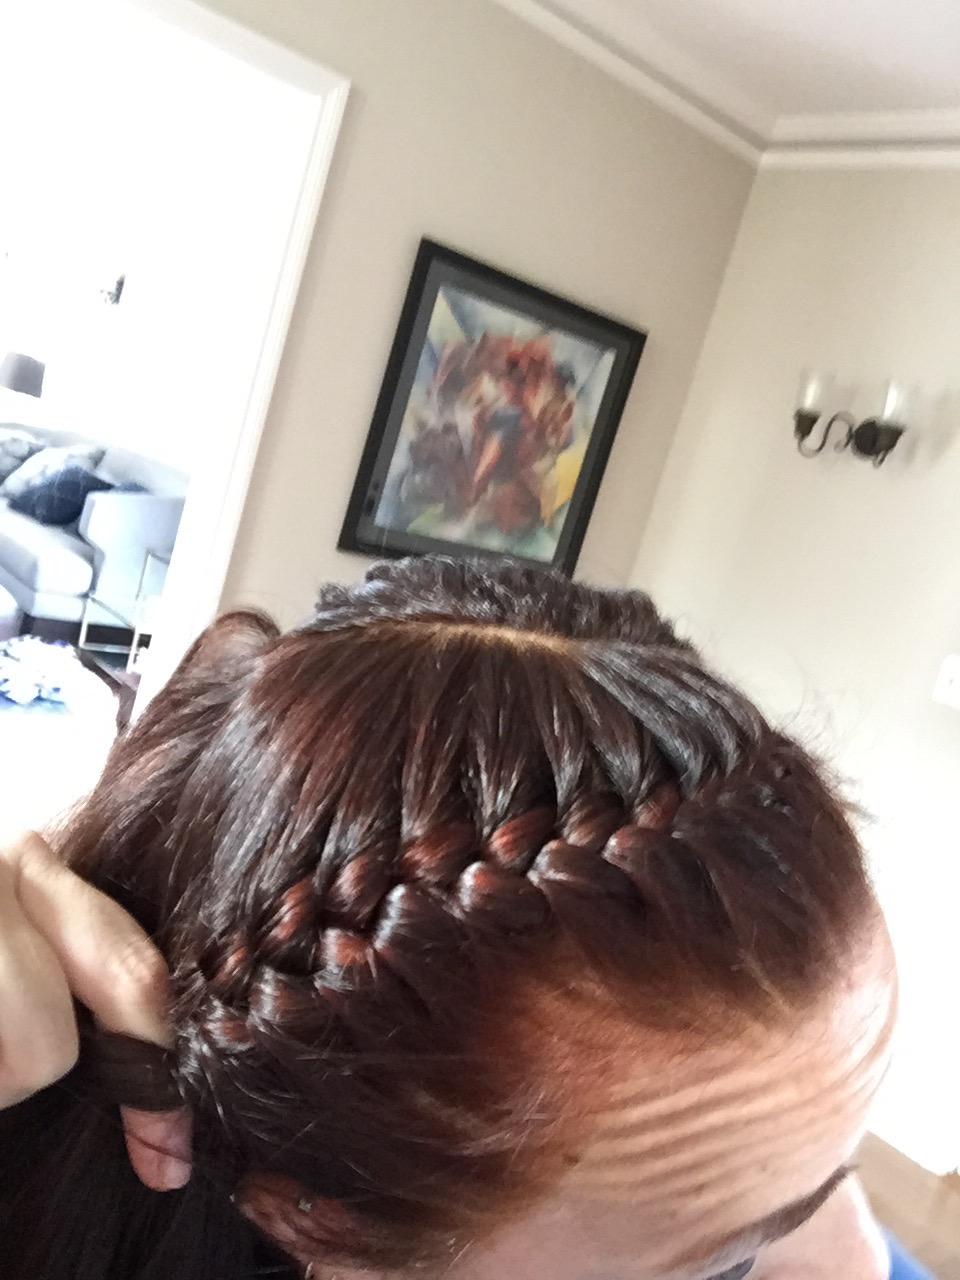
stay as close to your hairline as you can to get the best crown look

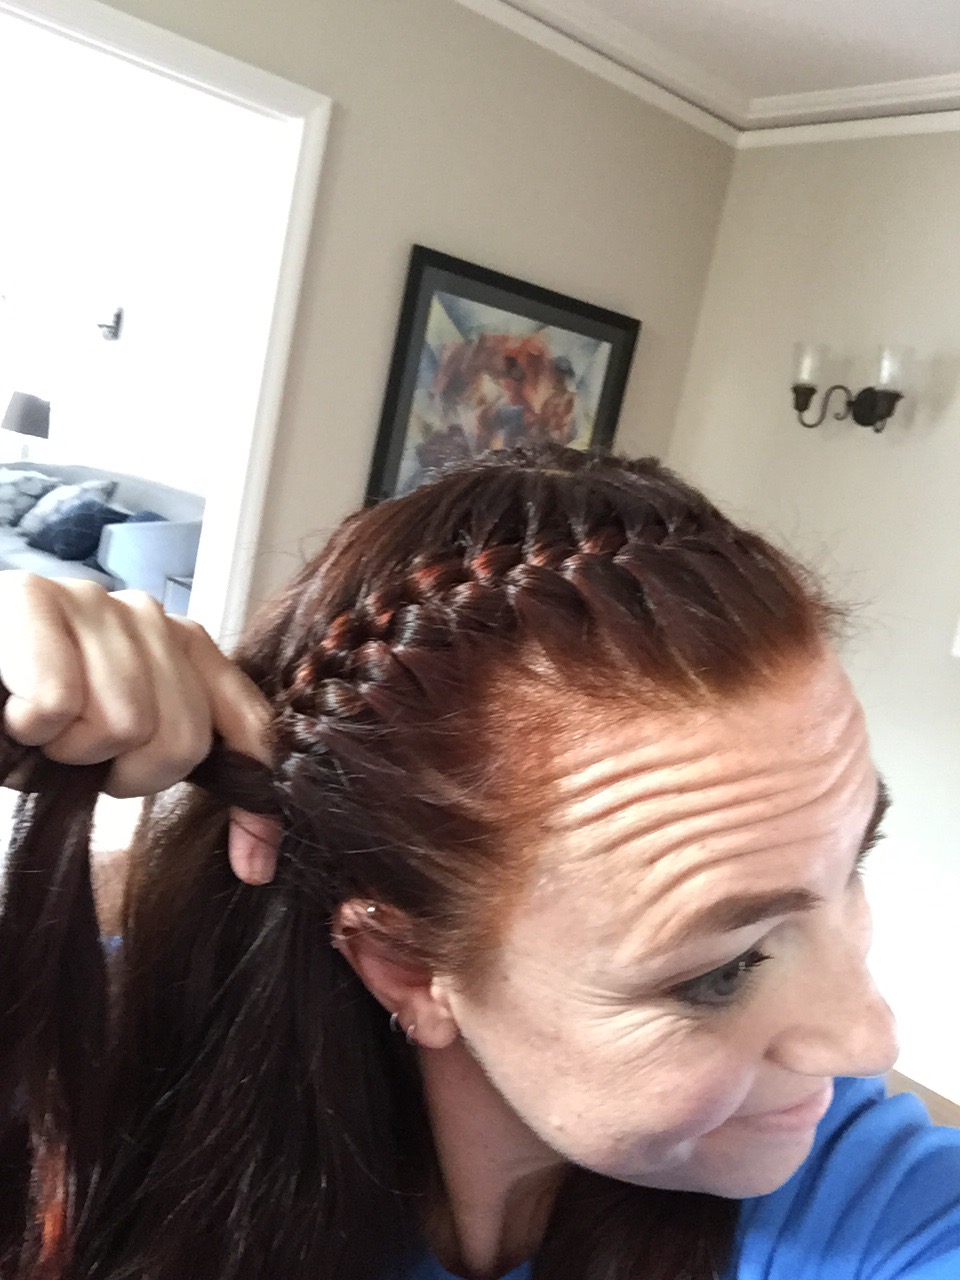
this is where you’re going to have to start to readjust your grip

once you reach the back you’re going to have to change your grip as you go across the back of your head

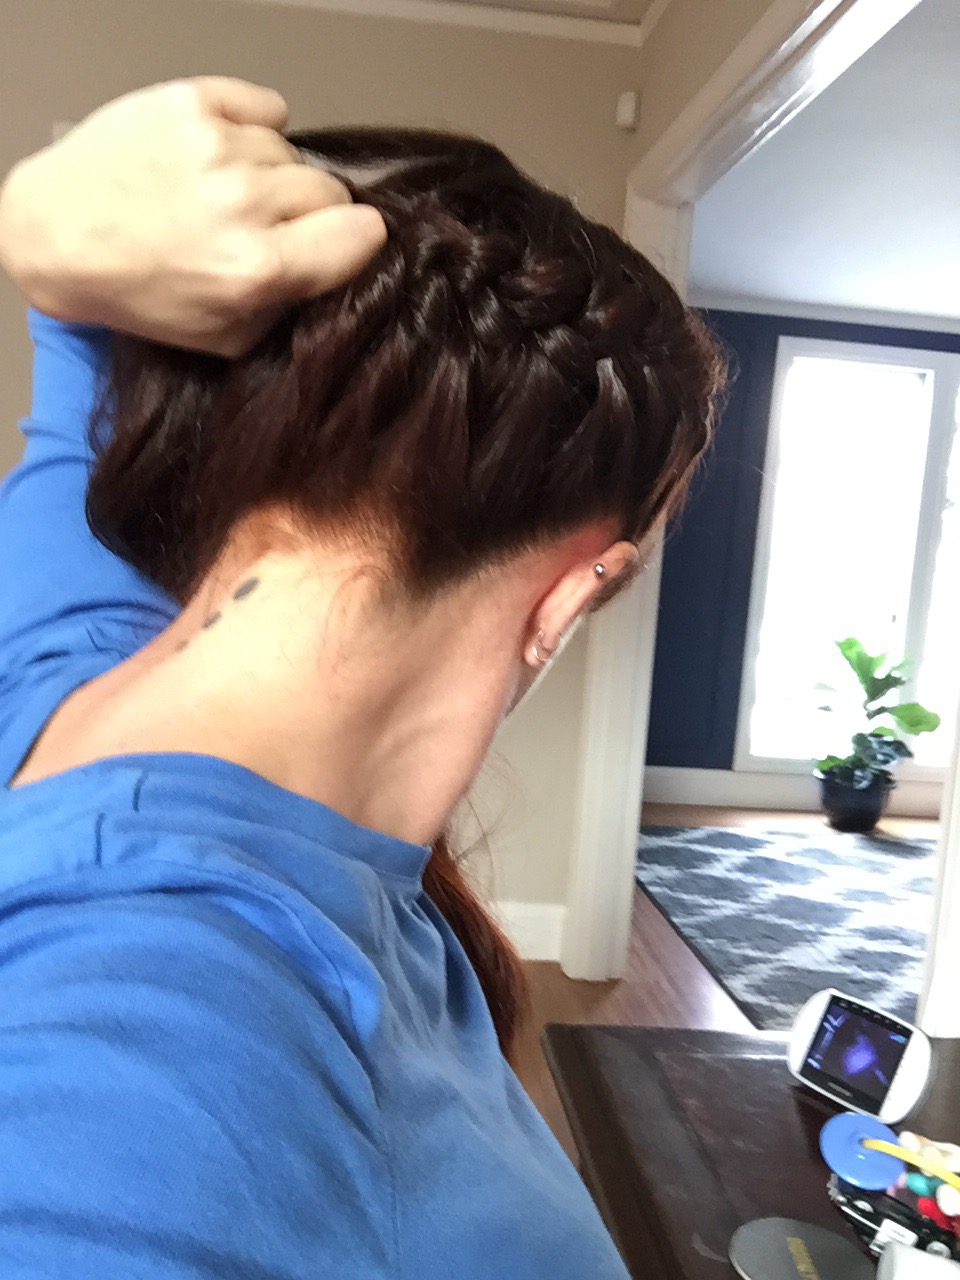
once you get to the other ear you will have to readjust your grip again

this last part is done upside down

finish the braid, wrap into a bun and pin to your head

Getting Real About Depression/Making an Old Skirt New Again

You may have noticed that it’s been a while since I’ve posted anything here. There’s a simple reason. I ran out of things to post about and I have been going through a period of depression. My depression is triggered by my anxiety and I tend to loose my creative drive during these periods of my life. These are lifelong conditions I have been dealing with since I was a child and a teen. They will never go away and I have and will continue to work hard to manage them. This does mean that there are times when I can’t get out of bed, and sewing or creating anything is simply beyond me. The last 5 months have been like that, but I’m happy to say that I’m coming out the other side and have gotten the creative juices rolling again.

The boyfriend of a good friend of mine played a show in Oakland last Friday followed by another group of friends closing out the show. I wanted to make something new to wear, but was having a really hard time choosing exactly what to make, and in classic Katy fashion, ran out of time.

Instead of finishing one of the four new projects I’m in the middle of, I chose to alter an old skirt to fit me now. This is something I had been meaning to do for months, but it took an actual social even to get me up and working again. This is a skirt I’ve posted about before here, but had never actually worn in real life.

I chose to leave the skirt as it was, but removed the waist band, re-sized it to fit me now and then gathered the skit to fit the new waistband. This way there was a little extra fullness at the waist, and I didn’t have to mess with getting the stripes to match up again.

It turned out that the hem was super uneven, so I did my best to straighten it out, and though there is still a slight dip in the back, it’s not enough for me to care!

The white tank is from H&M and yes, I am intentionally wearing it backwards. I have them in every color imaginable and have started to like wearing them like this. This way my boobs don’t fall out, and a tiny bit of my back tattoo shows 🙂

Up next, a quick tutorial on the Katy braid I’m wearing in the photos 😉

Another Tiny Hat for Another Tiny Head!

I needed to take a little break, but I’m working on a few new pieces and will be posting about them soon. In the meantime, here is another tiny hat for a tiny head! I made this one with a simple cotton that I reinforced with interfacing. If you’re interested in a custom one of your own, you can find me here on etsy, or email me at katyturner@gmail.com. You can find other hats here and here.


An Old Burgundy Linen Skirt with Flower Applique Made New

This is a skirt I made years ago and had photographed, but never posted about and have never actually worn. I don’t remember why I made it, or even when, but I found it cleaning out my sewing studio and realized that I had taken in a the waist at some point so figured I would take some new photos to show here.

Here it is now. Sadly no pockets, and it’s linen so its going to wrinkle like crazy, but its a fun skirt. It has what is called a paper-bag waist (so it’s meant to be worn tucked in) and double inverted box pleats for fullness. I top stitched everything to add some detail and to get it to all lay flat. I found the flower applique online, it’s basically just a really big iron on patch!

IMG_5588

IMG_5615

IMG_5627


And here is what it used to look like. Boy do I miss having Drew around to take photos! Using a tripod just isn’t the same.

red-applique-skirt-3

photo by the amazing Drew Beck

red-applique-skirt-1

photo by the amazing Drew Beck


p.s. If you would like to see more awesome things from Drew Beck, please check out his page!

My Dad Wrote A Book, There Was An Event, So Of Course I Made Myself A New Dress!

Tags

, , , , ,

My dad wrote a really wonderful book called David Brower: The Making of the Environmental Movement which you can buy here. I’m totally biased of course, he’s my dad, and I helped transcribe interviews, but it really is a fantastic book about an inspirational man who’s work revolutionaized conservation, but who’s name is sadly widely unknown. I actually knew Dave. I had the privilege of growing up just down the hill from the Browers and got to go to waffle breakfasts at their house on many a Sunday.

UC Press published the book and fittingly threw a party at the David Brower Center in Berkeley last night. For this occasion, I decided to make myself a new dress. Unfortunately it was cold enough that I never took my coat off, but thankfully I took pictures before hand!

The design took a while to come to me, but with the rainy weather we’ve been having I decided to try something pretty different for me;  I added sleeves. To start, I went to my favorite fabric store in Berkeley called Stonemountain & Daughter where they have a truly spectacular selection of Batiks. The second I saw the bolt of this fabric, I fell in love. I ended up walking around the store with it clutched in my arms for a while, and after a bit realized that I was basically petting it I loved it so much!

When it came to construction, instead of dealing with darts like I normally do, I chose to go with princess seams to get a nice fit. During the construction process I kept getting major 80s flashes so I ended up raising the waist a bit and did my best to take out any fullness in the sleeves. It’s tough to get the fit you want and still be able to move your arms, but I think I managed in the end.

I had wanted to play with the colors and pattern of the fabric and piece it together in a cool way, but given the amount of fabric I had, my options ended up being pretty limited. I like the way it turned out a lot, but I wish I could’ve played with where the lighter color ended up a bit more.

For some reason I have been having some fit issues with the neckline in the last couple dresses I have made and had to give a little tuck at the neckline to get everything laying flat. Of course I ended up loving the detail; yay for happy accidents!

img_4020

IMG_5542.JPG


Getting More Organized

I am constantly looking for ways to be better organized. My sewing studio has become a bit of a disaster area over the last year (life!) and I have finally started making a dent in getting it to the organized masterpiece I have always wanted it to be!

The two main things I had been meaning to do (aside from a general clean up) were to find a better and more accessible way of storing my sewing tools, and to install better lighting for my sewing table.

This week I finally got around to doing both.

For the lighting issue, I installed a strip of IKEA lights under the shelf that hangs over the table. I have these lights over my drafting table, as well as my bed. They are not the brightest lights ever, but I highly recommend them.

As for organizing my tools, I chose pegboard! I’m still figuring out the configuration and which hooks work with which tools, but it is already SO much better. Everything has its own place! I found everything at Home Depot and the instillation was VERY easy.

Back next week with a new dress!  

lighting BEFORE


lighting AFTER


tools in their proper places


cone thread getting some much needed organization


Throwback Thursday: Katie’s Wedding Dress and Lyal’s Wedding Shirt

5328_1197251327411_4929552_n

This beautiful woman is Katie. She is my oldest friend and I consider her family my family. She married her long time love Lyal in a fantastic celebration at Huntington Lake in the Sierra Mountains in the summer of 2009.

Katie and Lyal both asked me to dress them for the big day and I was so excited. Lyal wanted something totally crazy and also to wear a Daniel Boon hat which Katie and I quickly vetoed. Given the setting, we decided to go with something simple and romantic. 

I made Lyal an Indian inspired cotton shirt with abalone buttons, and I made Katie a beautiful romantic empire waist wedding dress with fluttery sleeves with antique lace details. The sash of the dress is made from the same material as Lyal’s shirt. I ended up with a lot of extra weight fabric from Katie’s dress and turned it in to a party dress which you can see here

   5328_1197314688995_8260977_n


Wedding Day 104

  
Miss you two!

Happy NYE!

Wishing you all peace, love and joy in 2016. 

Nothing new for me this week, but check out some tiny heads and tiny hats! Previous posts about other tiny hats and heads here and here.

Each hat I make is created custom for the head it will cover. All I need are some general guidelines like fabric color and patch preference (though no guarantees, I am at the mercy of the fabric stores stock) and the circumference of the head.


Ring Bear-er hats from my friend Caroline’s wedding!


Fire truck!


Butterfly

butterfly and fire truck


A purple owl for my adorable niece


yeah, she’s pretty cute!

Custom-made for a different head, but didnt fit. Fits this adorable head though!

Have a head you’d like me to cover? Find the listing on Etsy here

Merry Xmas Eve!

Merry Xmas/Happy Holidays!

This week I decided to finally make something out of one of the half finished dresses I have had in my closet for ages. This dress was supposed to be a wrap dress just like this one here and this top here.

half finished before

half finished before

My body has changed enough since I sewed this that the top of the dress was no longer an option. Time to become a skirt! I had originally planned on having the darker green as the main color, but looking at them now, I chose to go with the lighter green on top and the darker green peeking out the bottom. Turns out that that was a good plan as I found a really big faded spot in the dark green fabric!

oops


The dress was designed with an empire waist (i.e. it hit right under the bust) so I knew I would be able to make a mid-calf length skirt like I wanted.  I have two petticoats and I wanted the option of wearing this skirt with my longer black one.

The first step was to remove the top from the skirt. Then I figured out what length I wanted the skirt and then cut it into three even panels. Skirt are cut into three pieces, but the front panel is twice as big as the back pieces. Since I always put pockets in my designs, I have found that having the side seam a little closer to center front made using the pockets much easier. No more endless searches for my pockets with my hands! Then all I did was add a thin black waist band, hemmed both layers of skirts and put in a zipper.

I ended up finishing the skirt early and wore it (minus the petticoat) to a holiday party this past weekend. I really love the weight of the two layers of fabric and I can’t wait to wear it (with petticoat this time) tonight!

IMG_5390

with petticoat

twirl

twirl

I dare you to wear a petticoat and not twirl at least once!


IMG_5458

without the petticoat, showing off the pockets


IMG_5443

…and the back


The black top is from Target, and it’s hard to see them in the photos, but theses are the earrings I’m wearing. They are Katy Turner originals, and you can buy them from my Etsy shop here.

il_570xN.297166138

I got these fantastic new shoes from Modcloth.com and you can find them for sale here.
IMG_3615 (1)

An Apron For The Holidays 

For years I sewed personalized gifts for friends and family members for Christmas, but I ran out of ideas a few years ago and have since moved on to giving food gifts. This means that I’ll be spending a great deal of time in the kitchen over the next week. I have a few aprons at home that I use if I need one, but they are all store bought and just not my style. This apron has been laying half finished in my sewing room for three years and this week was the time to change that!

The fabric actually comes from the duvet cover and curtains I made when I first moved in to my cottage! I’m not sure where the color scheme came from (maybe I just really liked the leaf fabric?) but it became clear pretty quickly that it just wasn’t going to work with the space. I swapped it all out for blues and greens, but was left with lots of this fabric. I made a little apron for one of my neighbor on her 7th birthday (sadly never got a pic and she has since moved away) and quickly decided that I would like one for myself. Procrastination (or something) took hold though and I only now just finished it!

I may add pockets at a later date, but for now I’m thrilled with just a simple covering to keep me clean while baking and cooking!

IMG_5321

IMG_5343

IMG_5358

I personally hate halters, so I go out of my way to avoid things around my neck when designing for myself

I love the detail!

I have enough fabric for two more of these, if anyone is interested!